Last Updated on 03/03/2025 by textileblog
Why my sewing machine thread keeps breaking? It is very common and familiar question for beginner or old sewers. Frequently sewing thread breaking is very frustrating for sewing operators. In this article I will discuss different causes for thread breaking, along with solutions.
Reasons for Thread Breaking in Sewing Machine and Its Remedies
1. Threading and thread guides:
Is the machine threaded correctly? Try re-threading the machine. Compare the way your machine is threaded to the threading diagram in the owners manual to make sure the threading is correct. Check to see that the thread guides are clean and that the thread can pull smoothly from the thread spool. Make sure that the thread is not stuck or snagged on any of the thread guides or the thread spool or cone.
2. Tension disks:
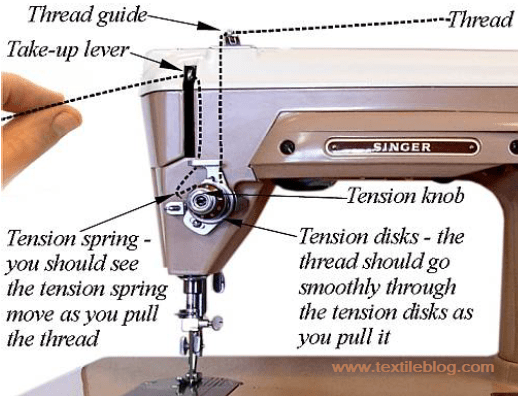
To check if the thread is feeding smoothly through the tension disks try the following test; With the presser foot down and the thread tension set to a normal setting (3 or 4 on most machines), un-thread the needle and pull some thread out from the take-up lever (this is shown in the picture below). Does the thread pull smoothly through the tension disks but with some tension? If not you should go to the upper thread path checklist.
3. Take-up spring:
Pull the thread from the take-up lever with your fingers (as shown in the picture below). When you start to pull the thread you should feel the take-up spring pulling against you. As you pull the thread you should see the take-up spring move. When you release the thread you should see the take-up spring move back to its original position. Not all machines have the take-up spring in a location that is visible, on some newer machines you can’t see the spring, but you should feel the force of the spring while you are pulling the thread on all machines.
4. Needle:
Check your needle is the correct size and not bent or damaged. Check that the needle is inserted correctly and that the needle is inserted all the way into the needle bar before the needle clamp is tightened. Try a new needle. Try a new needle from another manufacturer to make sure that you did not get a bad batch of needles. Is the needle the correct size and from the correct needle system? Your owners manual will list the correct system and size of needle for your machine. Make sure your needle is not too small, using a small needle with medium or large size thread can cause tension problems and thread breakage.
5. Feed dogs:
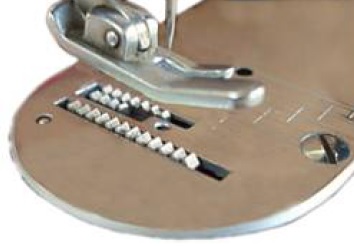
Check that the feed dogs are moving the fabric through the machine. Is the fabric moving forward? If not then try setting the machine to a medium or long stitch length. Very short stitch lengths can cause feed problems with some fabrics. Is there adequate presser foot pressure to hold the fabric in contact with the feed dogs? You may need to adjust the presser foot pressure if your machine has adjustable presser foot pressure. If the fabric is not moving through the machine try running the machine with no thread and see if the fabric will move through the machine. Sometimes tangled thread can stop the fabric from moving through the machine. Check that the feed dogs are moving. To do this first un-thread the machine and turn the hand wheel so that the needle is in the raised position. The feed dogs should also be in the raised position like in the picture below.
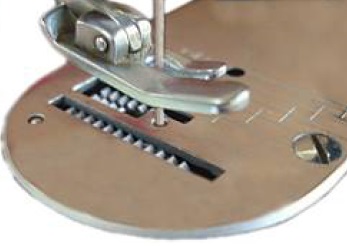
As you continue to turn the handwheel the feed dogs should move to the back of the machine and then as the needle moves down the feed dogs should also move down below the needle plate as in the below picture.
If the feed dogs are always in the lower position then check to see if your machine has dropping feed dogs. There may be a feed dog dropping knob and it may be in the down position. Check your owners manual, some machines have the feed dog dropping knob in a strange location like under the machine.
6. Starting tension:
Some machines do better if you hold the ends of the thread for the first few stitches while starting a seam to provide a little starting tension.
7. Thick seams:
Does the thread breaking when sewing thick seams but otherwise the machine sews OK? Is the fabric feeding through the machine correctly on thick seams? If not then make sure that you are not pushing or pulling the fabric through the machine, the feed dogs have to do the work.
Some seams are too thick for the feed dogs to handle. If you are trying to sew a thick seam and the feed dogs are not able to move the fabric over the seam there is a way to manually advance the machine. Make sure that you are not trying to sew seams that are too thick for the type of machine you are using.
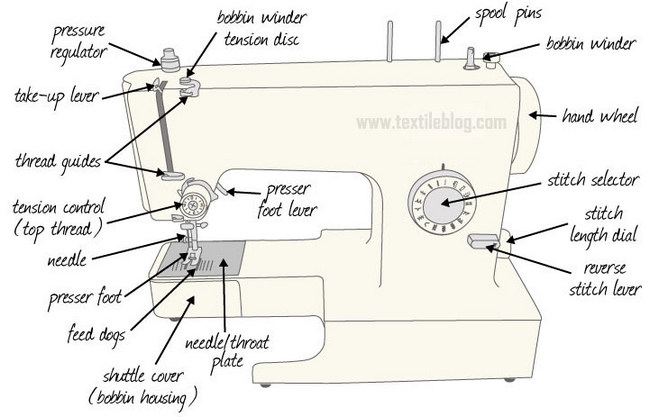
You may also like: Understanding Parts and Functions of Sewing Machine for Beginners
8. Tension release:
With the needle still unthreaded (like we did for step 2 and 3 above) move the presser foot to the up position and pull the thread again. Does the thread pull more easily then with the presser foot down? If not then go to the Thread path checklist. Some industrial machines and very old home machines do not have a tension release, in that case ignore this step.
9. Needle hole:
Is the needle hole obstructed or damaged? Check to see that a needle did not hit and damage the needle plate around the needle hole. You may need a flashlight and magnifier to properly inspect the needle hole.
10. Hook-race area:
Is the hook-race area clean and free from broken pieces of thread and lint? Is the hook-race properly oiled? (only if your machine needs oil in the hook-race, some machines do not require oil, check your owners manual).
11. Hook tip:
Check the hook and hook tip for damage. Is the hook tip sharp and free from burs or nicks in the metal? If the needle for some reason hits the hook it can damage the hook causing burs that will snag and break the thread. On most machines with a rotary hook you can rotate the handwheel and see the tip of the hook (if the hook cover is removed). On machines with an oscillating hook you can remove the shuttle-hook from the machine to inspect the hook.
12. Knotted or tangled thread:
Check for thread that is knotted, has tangles or is sticking on the spool. Knotted or tangled thread can hang in the thread guides, tension disks or needle and cause stitch problems and tread breakage.
13. Bad thread:
Check for bad or rotted thread. Try breaking some of the thread in your hands. Compare to other thread if you are not sure. Old, damp or bad thread can rot or have other problems. Thread can be improperly manufactured or improperly labeled (such as thread with the wrong twist).
14. Excessive thread tension:
Are you using too high a thread tension for the size of thread you are using? Try setting your thread tension to the normal setting for your machine. If there is excessive thread tension but your tension knob is set to a normal setting then you may have a problem with your tension assembly. Try cleaning the tension disks. If you can’t find the problem go to the thread path checklist for further troubleshooting.
15. Balanced stitch:
Check to see of the stitch is balanced. If the lock point is not in the center of the stitch then adjust the thread tension so that the stitch is balanced.
References:
- The Sewing Machine Master Guide: From Basic to Expert by Clifford L. Blodget
- Sewing Machine Reference Tool by Bernie Tobisch
- https://blog.treasurie.com
- https://www.apqs.com