
Drafting Process for Men’s Pants Pattern:
Pattern drafting is a process or technique of creating pattern on brown paper with accuracy and precision, based on the body measurements or standard measurement chart. For the purpose of drafting men’s pants pattern, required measurements of a specific size (102 cm seat) from the size chart are shown here:
- Seat: 102 cm
- Waist: 82 cm
- Body rise: 28 cm
- Inside leg measurement: 78 cm
- Trouser bottom width: 25 cm
- Waist band depth: 4 cm
Drafting details of men’s pants pattern is given below:
Top side pattern (Figure-1):
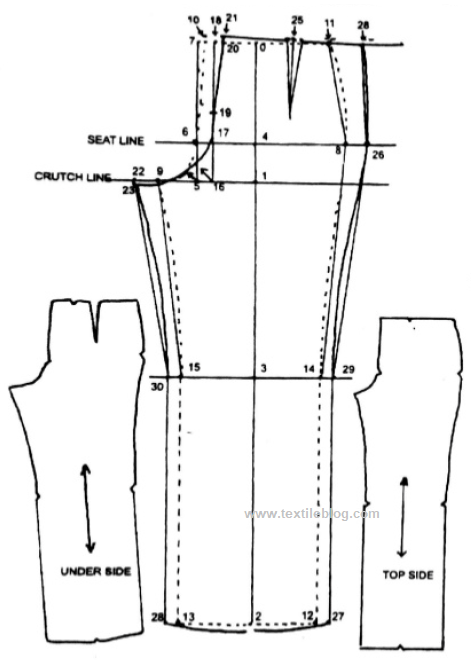
Need to draw three straight lines in 90 degree angles from the point 0 toward the downside, right side and left side.
0-1, Body rise + 1 cm – waist band dept. Then need to make perpendicular at the point 1 on the line (0-1) and to extend in two directions.
1-2, Inside leg measurement. Then need to make perpendicular at the point 2 on the line (1-2) and to extend in two directions.
2-3, ½ of (1-2) + 5 cm. Then need to make perpendicular at the point 3 on the line (1-2) and to extend in two directions.
1-4, ¼ of body rise measurement. Then need to make perpendicular at the point 4 on the line (0-1) and to extend in two directions.
1-5, 1/12 of seat measurement + 1.5 cm. Then need to make perpendicular at the point 5 on the line (1-5) which will mark the points 6 and 7.
6-8, ¼ of seat measurement + 2 cm.
5-9, 1/16 of seat measurement + 0.5 cm.
7-10, 1 cm. Then need to draw front curve as per the image joining the points 9, 6 and 10.
10-11, ¼ of waist measurement + 2.5 cm.
2-12, ½ of bottom width.
2-13, ½ of bottom width.
Then need to join with the straight lines 12-14 and 13-15. During 11-8 curve making, 0.5 cm toward the outside and during 8-14 curve making, 0.5 cm toward the inside need to be extended and reduced respectively.
Now the line made through the points 11, 8, 14, 12 indicate the side seam. Then during the drawing of 9-15 curve, it is to be drawn reducing 1 cm inside. Now the line made through the points 9, 15, 13 indicates the inside leg.
Under side pattern (Figure-1):
5-16, ¼ of (1-5). Then need to draw perpendicular at the point 16 on the line (1-16), as a result, the points 17 and 18 will be marked.
19, The middle point of (16-18).
18-20, 2 cm.
20-21, 1 cm.
9-22, ½ of (5-9) + 0.5 cm.
22-23, 0.5 cm. Then need to draw back fork as per the image joining the points 23, 19 and 21.
21-24, ¼ of waist + 4.5 cm.
25, The middle point of waist (21-24). Need to draw 12 cm long line below the point 25 at an angle of 90 degree with the line (21-24) and need to make a dart of 2.5 cm width.
17-26, ¼ of seat measurement + 3 cm.
12-27, 2cm.
13-28, 2 cm.
14-29, 2 cm.
15-30, 2 cm.
Then need to draw side seam as per the image, joining the points 24, 26, 29 and 27 and need to draw the inside leg joining the points 23, 30 and 28.
N.B: If easy fitting is required, then need to add 3.5 cm with width along the back crotch line.
Need to copy the under side from the Figure-1 and to mark it as the point 25. Then need to mark the point D, at a distance (25-D = 6 cm). For making back pocket the middle point of the pocket opening will be D and the width of the pocket opening needs to be marked as 14 cm.
Then need to copy the top side of the pant (Figure-2) and need to mark the point A on the side seam.
A-B, = 5 cm.
B-C, = 19 cm.
Then, need to cut along (B-C) and to separate it from the top side and need to add 5 cm allowance (as per the image).
Then, with the top side and bottom side of the pant, 5 cm hem allowances are to be added.
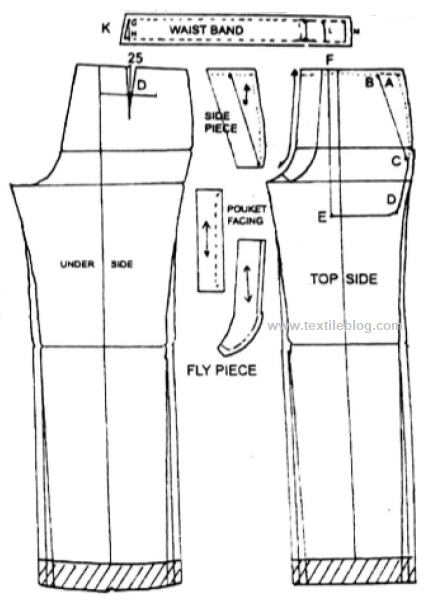
Fly piece (Figure-2):
On the front fork of the top side of the pant (as per the image), need to draw fly piece in 24 cm long and 5 cm wide and it is to be copied. Then with the outer end of the fly piece, need to add the required seam allowance.
Pocket facing (Figure-2):
Equal to the length of (B-C) + 2 cm, width = 6 cm.
Pocket Bag (Figure-2):
Pocket bag for the side pocket of the pant is shown in the image with the points A, C, D, E, F which is 32 cm long and 17 cm wide.
Waist band (Figure-2):
G-H, 4 cm.
G-I, ½ of waist line, need to draw the perpendicular (I-J) on the line (G-I) and the perpendicular (J-H) on the line (G-H).
H-K, 0.5 cm. Then need to join G-K.
G-K, Center back line.
I-L, 4 cm.
I-M, 9 cm.
G-L, The right side waist band, that has been made with extended fly.
G-M, The left side waist band that has been made with the front button stand. Then, need to add seam allowance around the waist band.
You may also like: How to Make a Shirt Pattern from Measurements