Last Updated: March 3, 2025
We already know that in previous article, pattern making is an important task in apparel manufacturing process. As per standard body measurement of boys, pattern making processes of shirts for boys of neck measurement 40 cm and chest measurement 100 cm, are described systematically below. The measurements which are required for making shirt pattern are taken from size chart.
- Neck size: 40 cm
- Chest: 100 cm
- Sky depth: 24.4 cm
- Normal waist length: 44.6 cm
- Half back: 20 cm
- Sleeve length: 80 cm
- Cuff size: 23. Cm
- Cuff depth: 6 cm
- Shirt length: 81 cm

Step by Step Shirt Pattern Making from Measurement:
Body section (Fig-a):
First of all need to mark 0 in a corner of a graph paper and then the line needs to be extended (0-3) to the right side from 0, and from 0, a straight line (0-5) needs to be drawn in 90 degree with the (0-3) line. Then,
0-1, Sky depth + 4 cm, then need to draw a straight line from 1 toward the right direction with (0-1) at 90 degree angle.
0-2, Normal waist length + 3 cm, then need to draw a straight line from 2 toward the right direction with (0-2) at 90 degree angle.
0-3, Length of the shirt + 5 cm, then need to draw a straight line from 3 toward the right with (0-3) at 90 degree angle.
1-4, ½ chest + 12 cm, then need to extend in 90 degree angle with the line upward up to 5 from 4 and downward up to 6 (1-4).
0-7, 1/5 neck size – 0.5 cm, then need to draw line upward in 90 degree from 7.
7-8, After 4.5 cm, need to draw neck curve as per the image.
0-9, 1/5th of the measurement (0-1) + 2 cm, then need to draw a straight line from 9 toward the right direction with (0-9) at 90 degree angle.
9-10, ½ back + 4 cm, then need to mark 12 drawing a straight line upward and 11 drawing a straight line downward from 10 with the line 9-100 at 90 degree angle.
12-13, 0.75 cm, then need to join 8-13 slight curved.
10-14, 10 cm.
10-15, 0.75 cm, then need to join 14-15 slight curved.
1-16, ½ of the measurement (1-4) + 0.50 cm, then need to draw straight line downward from 16 with the line 1-16 at 90 degree angle. As a result, the points 17 and 18 will be marked.
5-19, 4.5 cm, then need to draw straight line as per the image from 19 with the line 5-19 at 90 degree angle.
19-20, 1/5th of neck size – 1 cm.
19-21, 1/5th of neck size – 2.5 cm, then need to draw neck curve (20-21)
10-22, 1.5 cm, then need to draw straight line toward the right side from 22 with the line 22-11 90 degree angle.
20-23, The measurement of (8-13) + 0.50 cm, then need to join 20-23 with a slight curve.
1-24, 1/3 of chest + 4.5 cm.
24-25, Need to draw 3 cm perpendicular upward from 24 with the line 1-24 at 90 degree. Then need to join 23-25.
23-26, It is the half of the measurement of 23-25. Then need to make the armhole by joining the points 13, 10, 16, 25 and 23 and by drawing the curve line going through 1 cm from the inner side of the point 26.
21-27, 1.5 cm button stand, then need to draw parallel line from 27 with the line 21-6.
27-28, 3.5 cm for facing, then need to draw parallel line from 28 with the line 21-6 and need to make the curve line adjusting with the curve of neck line from slightly above the point 28.
17-29, 2 cm
17-30, 2 cm
18-31, 10 cm, then need to draw line at both sides of the point 31 at 90 degree angle with the line 18-31.
31-32, 1 cm
31-33, 1 cm, then need to make side seams lines by drawing the two curves joining the points 16, 30, 33 and 16, 29, 32.
34, After marking the middle point of 6-18, need to draw perpendicular from 34 on the line 6-18.
35, Need to mark the middle point of 3-18.
34-36, 2 cm, then need to draw line from 36 at the right side making parallel with the line 6-18.
Then as per Fig-a, need to draw curves 33-35 and 32-36. If pleat is required at the back side of the shirt then 9-37, adding 2 cm, need to draw parallel line from 37 with the line 9-3. This way, for the body of shirt, one front part and the half part of the back part of the shirt can be made (Fig-a).
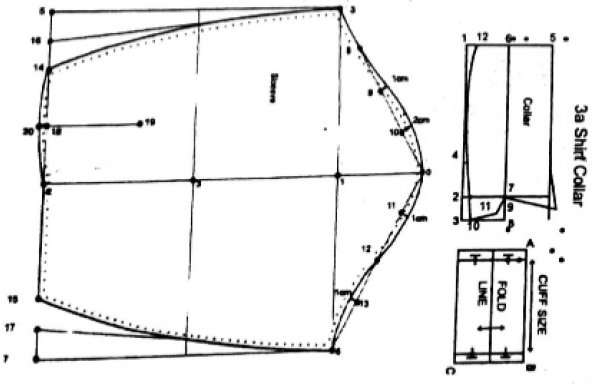
Sleeve Section (Fig-a/1)
In the same way, first of all need to mark a point on a graph paper, which is called the starting point 0. Then,
0-1, ¼ of arm sky measurement (the curve of the points 13, 16, 23 of Fig-a is called the arm sky measurement), then need to extend the straight line at both side from 1 at 90 degree angle with the line 0-1.
0-2, Sleeve length + 3 cm – {the width of cuff + ½ of yoke length (0-13)}
3, Middle point of (1-2), need to extend the straight line on both sides from 3 at an angle of 90 degree with the line (1-2).
0-4, ½ of the sky measurement, need to draw the straight line (4-5) from 4 toward downward at an angle of 90 degree with the line (1-4).
0-6, ½ of the sky measurement, need to draw the straight line (6-7) from 6 toward downward at an angle of 90 degree with the line (1-6).
Then need to divide the line (o-4) into 4 equal parts and mark the points 8, 9, 10 and divide the line (0-6) in 4 equal parts and mark the points 11, 12, 13. Then for the purpose of drawing the sleeve head, draw curve from 4, 8 and 1 cm above 9 and 2 cm above 10, then through the point 0 and 1 cm above along 11, through the point 12 and 1 cm below along 13, need to draw curve up to the point 6.
5-14, 1/3 of the measurement of 2-5.
7-15, 1/3 of the measurement of 2-7.
16, The middle point of 7-14, then need to join 4-14.
17, The middle point of 7-15, then need to join 6-17. Then after drawing the curves 4-14 and 6-15 (as per the image), need to make the under arm seamline.
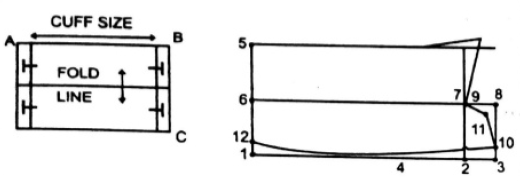
Cuff (Fig-b)
A-B, Cuff size + 4 cm
B-C, (Cuff depth x 2) + 2 cm
Need to make such two patterns for two cuffs.
Collar (Fig-b)
1-2, ½ of the neck measurement.
2-3, Button stand + 1.25 cm.
1-4, ¾ of (1-2). Then need to draw 3 perpendiculars at the points 1,2,, and 3 on the straight line (1-3).
1-5, The width of collar and stand (normally 8 cm) + 2 cm. Then need to draw parallel line with the line (1-2) from the point 5.
1-6, ½ of (1-5). Then need to draw perpendicular from the point 6 on the line (1-5) which will mark the points 7 and 8.
8-9, 1 cm then need to draw the line (3-9). Both the lines (9-11) and (3-10) are 0.75 cm.
1-12, 0.50 cm.
5-7, Need to draw style line.
Now need to make the ½ pattern of the collar by joining the points 12, 4, 10, 11, 7 and 5 and the pattern of the full collar need to be drawn from the half pattern. Based on the styles, collars can be made in various ways.
Actually drafting a shirt pattern is not very difficult task but not as very easy. Shirt pattern is the perfect starting point if you are just learning how to sew & wanting to make your own shirt. By following this article you can easily make shirt pattern that can be altered for different looks and materials.
References:
- Garments & Technology by Prof. M. A. Kashem
- Apparel Manufacturing Technology by T. Karthik, P. Ganesan, D. Gopalakrishnan
- Garment Manufacturing Technology Edited by Rajkishore Nayak and Rajiv Padhye
- Garment Manufacturing Technology by Md. Shafiul Azam, Md. Abu Saleh & Khondokar Abu Nafiz
- https://textilelearner.net/drafting-procedure-of-long-sleeve-woven-shirt/