Last Updated on 24/02/2025 by textileblog
What is Fashion Draping?
Draping is the art of clothing arrangement loosely or casually on or around dress form. In fashion designing, fashion draping is the main part of garment design. Fashion draping is the process of positioning and pinning fabric on a dress form to develop a clothing design into a three-dimensional form.
“Draping” is the term for using fabric to create a design directly on a mannequin or dress form. It is an essential skill for a fashion designer.
Draping is the most creative way for a fashion designer to turn design ideas into reality. To create new garment design, designer can draped fabric using a design sketch as a basis. After complete the draping process, fabric is removed from the dress form and it used to create the sewing pattern for the garment. One that is made on the individual is more adequate and less costly than a commercially made form.
Draping offers an alternative method of creating a pattern by working directly on the stand with fabric. It offers immediate results but requires a level of dexterity and manipulative skills, which can be taught and developed with practice. For some designers this is a more intuitive process; one that can help to confirm the visualization process needed to realize a three-dimensional form.
Draping does not reflect usual methods of production in industry but does offer a designer the creative experience of exploring the relationship between shape and fit. It can be readily applied to a variety of woven and knitted fabrics and used to create fitted shapes as well as to drape fullness around the body. It is more usually applied to womenswear than to menswear; in particular, biascut styles, eveningwear, ball gowns bridalwear and experimental shapes where immediate results can be obtained.
Fashion draping is otherwise known as toiling or modelling. Fashion draping is the manipulation of two-dimensional fabrics on a three-dimensional torso or body form to get a perfect fit. The dress form generally used for draping is a muslin padded dress form, positioned in an adjustable stand that duplicates the human body structure. The dress form should be firm, yet resilient and should not resist pins. A range of dress forms exist in standard sizes for children’s and men’s figures. The steps for the preparation of a dress form are given below.
- The dummy should be checked for both bust and hip measurement.
- It should be padded to get the required measurement by using high density foam. The foam is adjusted in such a way that it assumes the shape of the human breast.
- A square piece of quilt batting is pinned onto the formed breast. While pinning the batting, care is taken to see that it is slightly larger
than the required size at the sides. When it is covered with muslin, it gets compressed to the right size and looks more natural. - Batting should be done equally on both sides.
Mainly Draping can be approached in 2 ways. They are:
- Planned way of draping – based on reference image / sketch
- Spontaneous draping – driven by the weight and fall of the fabric
Importance of Fashion Draping in Fashion Designing:
Most of the fashion industry, like high fashion, haute couture fashion houses, evening, and lingerie companies most garments are created through draping. When draping a garment, the designer can immediately see what her apparel design will look like on the body, and immediately correct any fit or design problems before putting anything down on paper. In addition, some apparel designs are just impossible to make via flat pattern making and need to be draped first. And some fabrics need to be experimented with on a dress form to see how they behave.
Every fashion designer should have the knowledge about draping. It also helps to developing your artistic and manual skills. Some other necessity of fashion draping are as follows:
- It helps to be able to combine new up-to-date looks
- To understand the human body proportions also get the required shape and fit of the garments.
- To understand about various fabric grains and its advantages
- To introduce the basic vocabulary of the fashion such as – high waist, empire line, low waist, princes line, style line, Halter, etc.
- To improve manual skills.
- To improve concentration and precision
- To develop your design creativity
- It make capable of processing various types of fabric and giving them form and harmony.
- Be able to work in an international ambient
- To gain knowledge to work with professionals
- To improve your fashion portfolio
Materials or Tools are Needed in Fashion Draping:
- Two shirts of thin knitted fabric like a T-shirt.
- US8, US10, US12 sizes of dress form can be chosen according to the requirement.
- Thin muslin fabric which is cut in the bias direction or a dress form kit, which will contain all the required material.
- Medium weight 1” wide adhesive papers.
- Sewing machine.
- Iron box
- Brown paper for pattern making.
- Measurement chart
Those are also used as draping tools; Colored scotch tape, two sponges, two small basins for water, arm hole curve, graduated-square, pins, marking-chalk, needle, thread, sharp scissors, pencil, ruler, tapeline, a sharp razor blade, sharpeners, notches, French-curves, foot-ruler, grade-ruler, dark colored twill tape, measuring tape, hip curve, sleeve curve tools are required.
Draped Pattern Making:
Draped pattern making is the link between designs and production of a specified garment. At first fashion designers sketch the design and that turns into a three-dimensional functional garment. Draping process is a way of interpreting the design regardless of the style, size and shape. The fabric is manipulated, molded, and shaped through the skillful use of the draper/designer’s hand, until the design is replicated in three-dimensional form.
In the fashion industry, patterning paper is often used to create the flat pattern. Most of the professional theatrical costume shops and educational institutes use brown craft paper instead because it is much less expensive and easier to find.
Basic sloper patterns (master patterns) are also used to create draped and stylized garments. Even sleeves are constructed with the help of the sloper.
Preparation of Draping for Muslin Fabric:
The fabric you choose to drape with should be woven, not knit, and of similar weight and drape as the actual fabric that you will be using to build the costume. Most drapers use 100 percent cotton muslin (which is why a fitting mock-up is often referred to as a “muslin”). In the traditional garment industry. Muslin is the standard used for “toiles,”or fitting prototypes. Muslin comes in a variety of weights, and inexpensive synthetic fabrics can also be used in fitting and draping for apparel design. There are four different types of muslin are used for draping.
- Standard muslin
- Cotton twill
- Cotton voile
- Silk/hemp muslin
Tearing:
- Estimate the size of muslin needed, allowing a reasonable amount of extra fabric for ease, seam allowance, and styling.
- Clip the edge of the muslin with scissors and tear across the grain with sufficient pressure to break the yarns evenly.
- The true crosswise grain or the true lengthwise grain should from the edge of muslin used for draping. Because the selvage is closely woven, it tends to hold in the muslin and often will throw the weave off; therefore, the center front and center back should be planned at least 3” from the selvage.
Blocking:
Before draping, muslin may have to be re-shaped so that yarns of the crosswise and lengthwise grains are at perfect right angels to each other. To re-shaped muslin, pull the edges diagonally until the fabric is squared.
Pressing:
- Once the fabric has been blocked, set the position of the yarns with the steam and heat of pressing.
- Press in the directions of the lengthwise and the crosswise grains. Never press on the bais.
- Apply steam followed by a dry iron.
Seam allowances:
Seam allowances in apparel demand. Beginning students of draping are usually expected to add 1” seam allowances on all straight seams, including side seams, waistline seams, and under arm seams. All curved seams are planned with ½” seam allowances.
When draping the fabrics on dress forms some important points should be consider.
- GSM of the Fabric (Weight)
- The bias, selvage of the fabric
- Pattern, texture and muslin mock-ups
- Darts, seam location, finishing
Different Methods / Techniques of Fashion Draping:
Draping is a key skill which allows apparel designers to understand what creates a great fit and how to achieve it. Cutting and draping special occasion clothes concentrates on the construction of blocks and patterns for very close-fitting bodices and other dramatic style features found in evening and party wear.
Fashion designers drape garments in sections i.e.: front bodice, back bodice, front skirt, back skirt etc. and only the right side of the garment (when worn) is draped, unless the apparel design is asymmetrical.
Generally four persons are required to build the body form quickly. Two persons are needed for moistening the cloth strips and two persons for pasting the fabric strips to a person who should wear a tight garment which gives the needed style lines. All strips should be cut prior to creating the form on the person concerned. The various steps in the pattern draping method are shown in Figure.
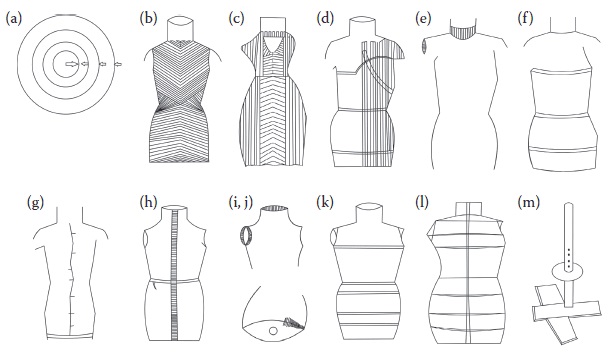
a. The figure shows the depth that each group of strips is cut from the two rolls. Each batch should be labelled as it is cut.
- The first batch of strips has to be cut 3/4″ from outside of both fabric rolls and is roughly 15–12″ long. These fabrics are used for draping from shoulder to waist on the first layer, and on bias manner from the neck down front and back on the second layer.
- The second batch of fabric strips of about 12–9″has to be cut 3/4″from outside of each roll. These strips are utilized for draping on the first layer from waist to hip (lower edge) as well as on the second layer down from the neck in front and back.
- The third batch of strips of about 9–5″has to be cut 3/4″from the outside edge of the roll.
- About 250 of 3″strips have to be cut for finishing edges of the form and for joining the two sections.
b. The shirt has to be put on the person concerned and then the edges are sewn together; hence, it will fit firmly on the figure. Afterward, the shirt has to be pulled down from the shoulder line and a strip of moistened tape should be pasted carefully around the waistline. Another strip of tape has to be pasted below the widest hip and under each bust to maintain contour.
c. The first layer of strips, which is about 12–15”, has to be pasted on the figure from neck and shoulder edges to taped waistline, overlapping 3/4″ of the width of the strip. Further pasting of strips has to be done for the armscye edge and overlapping of strips at the top of the shoulder. The same method has to be repeated for another side of the front and back. After pasting the strip at right angles to the waist, the tape ends should be joined to those above the waist and another strip of about 5–9″ in bias way from underarm to lower hip edge. The procedure has to be repeated for the other side also.
d. For pasting the second layer of tape, strips of about 9–12″ have to be used. Starting from below the neck, the strips have to be pasted in the bias way across the front, alternating strips from the right and left side. The crossed strips should be continued down the body to lower hip line edge, using strips of about 12–15″ below the waistline.
The second layer of strips from the underarm to the hip line should be reinforced with strips of about 5–9″ in a similar manner as in c.
e. The armscye area should be strengthened to form a good structure by using strips of about 3–5″. The neck area has to be finished with a layer of strips about 5–9″ around the neck to maintain a good shape.
f. Before removing the neck, bust and waist, measurement have to be taken from the floor up to 2 or 3″ below the widest hip and it is marked at the base of the form.
g. Center front and back with ruled line and across the front and back have to be marked before removing the form from the person, for matching when joining the half sectional. The difference between the person with and without form at the neck, bust, waist and hip has to be noted and necessary calculations have to be done. Then the form has to be cut along the hipline which is parallel to the floor.
h. Both sections are joined using strips of about 3″ wide in front as well as back.
i. The neck and armscye edges have to be trimmed and reinforced with 3″ strips around the cut edge.
j. The bottom of the form has to be trimmed until it stands evenly on the table. Cardboard has to be cut from paper patterns and a 1¼″ hole in the centre also has to be cut. Then the cardboard flush is fitted onto the inside edges of the hip and neck and joined to the form with 3″ strips.
k. and l. Outer covering – The form should be shellacked and dried to avoid curling of paper. A top shirt should be tightly and smoothly fitted over the form, and sewing can be done wherever necessary. The taping should be done at the armscye, neck and under the lower edge of the form.
m. A stand made of two 2 × 4 × 18″ pieces of wood for a base, and a pole 5–5½′ tall and 1¼″ in diameter with nail holes bored up the length to adjust the height can be used to keep the form.
Draping on the Stand:
Before draping, it is important to select your dress stand carefully and make sure that it offers the correct shape and balance. The stand should be clearly marked with the bust, waist and hip positions. The draping process is informed by the choice of fabric and whether you intend to work with straight grain, a crosswise grain or bias, or the true 45º bias, which offers distinct draping qualities.
Before working directly on the stand the fabric should be carefully examined for any flaws. It should then be prepared for draping by marking on the center-front grain-line and the bust line. Some fabrics will need to be pressed before they can be used to remove unnecessary creases or eliminate possible shrinkage. Make sure you are using good-quality pins and that you have a sharp pair of shears or dressmaking scissors.
When working directly on the stand it is crucial to understand balance. This refers to the hang of the draped material. Whether you are working with the straight grain or the bias, your design should be balanced without any unplanned dragging, twisting or pulling of the fabric. These signs will indicate an imbalance that should be addressed before continuing with the drape.
One of the main advantages of this method is building up a desired effect before cutting into the fabric through experimenting.
The various stages of draping on the stand are given below:
Stage 1: Draping of uncut length of dress fabric over the stand – The fabric should be draped on the stand for analyzing the overall effect by observing its natural characteristics such as handle, texture and weight and it has to be evaluated.
Stage 2: Substitution of dress fabrics – Modelling the whole garment using actual fabric is ideal but it makes experimentation more costly. Hence, it is advisable to utilize a fabric having similar properties as that of the actual fabric which has been left over from a previous collection.
Stage 3: Taping of stand – Center front, center back shoulders, seam lines, style line, neck lines, waist, hip and bust line and position and direction of drapes.
Stage 4: Selection and preparation of material – Prepare the garment material and since the whole garment is cut, allow enough material to cover both sides of the stand for each section. The draping quality of the warp and weft grain should be the same in order to match both sides of a drape. Allow plenty of excess material beyond the outer edges of the stand and mark in the centre vertical line and the warp grain with a contrasting thread.
Stage 5: Placing and pinning of material onto the stand – A full toile or torso is normally required; however, one side only is needed to model, except for asymmetric designs. Pining of excess fabric has to be done temporarily to the side of the stand and then the fabric is moulded around the stand as desired, allowing the extra fabric to fall freely into the area where the fullness is desired. The techniques used for controlling the drape are given below.
- By mounting the drapes on a fitted section
- By weights places inside the drapes
- By taping
Stage 6: All the details should be indicated with pins rather than chalk and it should follow the direction of any darts, tucks, seams, etc.
Stage 7: The fabric should be removed from the stand.
Stage 8: Then pressing of the fabric (except pins) has to be carried out.
Stage 9: Trueing of rough design needs to be carried out in order to establish the correct grain line and to ensure that the armhole, underarm seams and shoulder are the same length.
Stage 10: Seam allowances have to be checked.
Stage 11: Make up and press.
Stage 12: The model has to be checked for any discrepancies.
References:
- Draping for fashion Design –Hilde Jaffe, Nurie Relis
- Fashion Design: The Complete Guide by John Hopkins
- Draping-The Complete Course -Karolyn Kiisel
- Draping period costume – Sharon Sobel
- Apparel Manufacturing Technology By T. Karthik, P. Ganesan and D. Gopalakrishnan
- https://textilelearner.net/fashion-draping-techniques/
- http://www.fibre2fashion.com
- www.universityoffashion.com