
What is Pattern Altering?
Generally commercial sewing patterns are designed for a generalized, average body measurement. But nobody is “average”. Everyone’s body is unique, so a pattern, by definition, can’t fit you perfectly right out of the envelope. Getting the perfect fit isn’t luck. It comes from understanding how to alter a pattern the right way. Altering a sewing pattern is key to achieving garments that fit perfectly and feel comfortable.
Your body measurements are unlikely to be exactly the same as those of your chosen pattern, so you will need to alter the pattern. Here is how to lengthen and shorten pattern pieces, and how to make specific alterations at the bust, waist and hips, shoulders and back, and to sleeves and pants.
Before altering any pattern, it helps to prepare a few basics. Accurate body measurements, a clear understanding of ease, and properly marked grainlines make every method easier and far more accurate. Keeping a ruler, tracing paper, and fine markers close by saves time and reduces mistakes, especially when comparing your measurements to the pattern’s finished garment measurements.
Using a multisize pattern has many advantages, since you can cut it to suit your unique individual shape—for example, to accommodate a hip measurement that may be two sizes different from a waist measurement, if you are not precisely one size or another. With the overall principles of flat pattern alteration in mind, the next job is to decide what altering method will be most helpful for the issue that needs to be adjusted.
In this article, I will explain a clear, beginner-friendly guide to the most common and effective ways of altering pattern for a perfect fit.
Different Ways of Altering a Pattern: Complete Guide for Perfect Fit
Approach 1: The Muslin Method
Making and adjusting a trial garment before working with the fashion fabric is the gold standard of fitting. Nothing ever behaves like fabric but fabric, and having the opportunity to fine-tune a pattern in the real thing is the best way to adjust any pattern.
A muslin trial garment, also called a toile, can let much be done. In addition to making the necessary changes to width and length very obvious, a muslin also gives the chance to play around with and adjust the more three-dimensional aspects of garment fitting, such as darts and princess seams. These shaping elements of construction can be reshaped and repositioned, added where needed, or even removed until the fit is perfect.
Working with a muslin allows pinching in excesses, taking up folds, and letting out seams. Extensions can be sewn in where necessary to add width and length. Fitting in fabric also gives the chance to correct grain where needed—rehanging a sleeve so it hangs straight on a rounded shoulder, for example, or adjusting the waistline of a pair of pants, moving it up and down around the body until the legs hang properly.
Fitting with a Muslin
Muslin fitting provides important information about how a final garment might fit. The muslin can be either a basic shape-fitting pattern for general fit information or a trial version of a specific pattern to be tested. Using the muslin to fit is not difficult. Work methodically.
- Use a muslin or any stable-grain fabric for the fitting garment and draw a straight-of-grain line on the fabric with a fine marker so it is easy to see.
- Cut out the pattern with larger, approximately 1˝ seam allowances. This will give room to let seams out if needed. Don’t cut out the facings and collars yet; wait until seeing if they need to be fitted to match changes in the main garment pieces.
- Mark the pieces with key information such as waist and bust levels, hip depth, and the high and low points of the lower body contours to help double-check dart placement and length. Label each pattern piece, mark all dots, and identify left and right sides.
- Construct the entire garment with a machine basting stitch. Leave long thread tails so seams stay secure during fitting but remain easy to remove. Set in the sleeves, baste up hems, and install zippers by basting.
- Staystitch around necklines and sleeveless armholes so changes can be made at stitching lines. Clip these openings so they lie flat during fitting.
- Try on the muslin. Note where changes need to be made, letting out or taking in seams and adding extensions if necessary.
Count on at least three fittings when working with a muslin. A tweak in one area can change the fit in another, so take time to resolve all issues.
Approach 2: The Simple Side-Seam Additions Method
Not all flat-pattern alterations need the work of a muslin. Many common adjustments can be made directly to the pattern pieces based on discrepancies between body and pattern-size measurements. The most basic way this is done is by minor adjustments to the side seams.
Multisize patterns make this easy, offering the opportunity to cut size 10 shoulders, size 12 waist, and size 14 hips. Single-size patterns, however, require making additions manually.
Make all changes to the side or the side front seams, never along the center front or center back. Alterations to the center of garments, crotch seams excepted, are difficult and should be avoided.
Making Side-Seam Additions
Calculate the amount to be added and divide it by the number of seams. In a skirt with a simple front and back, that would be four side-seam allowances: two at the front and two at the back.
For example, to accommodate a waist that is 4˝ wider than the pattern, add 1˝ to each side seam for a total addition of 4˝. Taper the addition down to the widest part of the lower body.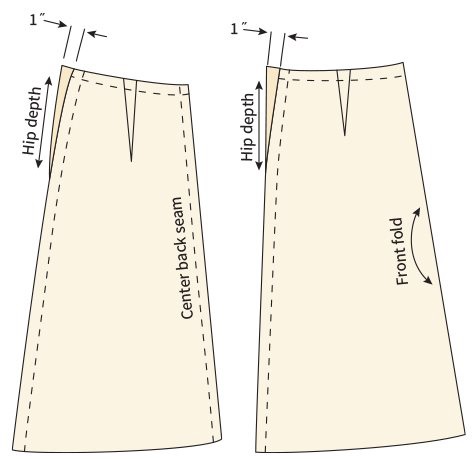
The more seams available, the more graceful the adjustment. A 4½˝ addition divided by the 12 seam allowances of a 6-panel skirt would require only ⅜˝ added to each seam.
Once a seam has been moved out, it shouldn’t be moved back in further down. When adding extra to a hip area, continue the addition right down to the hem. For a straight skirt, it is possible to “peg” the skirt slightly near the hem for shape, but only by a few inches.
If an increase is made in an area that has a connecting piece, make a similar increase in the connecting piece so they still fit together. For example, if additions are made to the side seams of a T-shirt, the same addition must be made to the sleeve seams.
Approach 3: The Block Method
More complex pattern alterations can also be simplified. The block method allows repositioning shaping details and seams by cutting around them and moving them over, up, or down.
You may also like: How to Make a Master Pattern and Using in Design
Using the Block Method
This method can be used to raise or lower darts. To lower a dart, rather than moving only the dart point, cut a box around the entire dart and move it down the required distance.
The block method can also be used to correct horizontal folds that appear under the seat at the top of the legs. These folds are often caused by a low seat. The fix is made by cutting out a block from mid-center back crotch to about 3˝ down the back inseam, sliding it down, and truing the seams.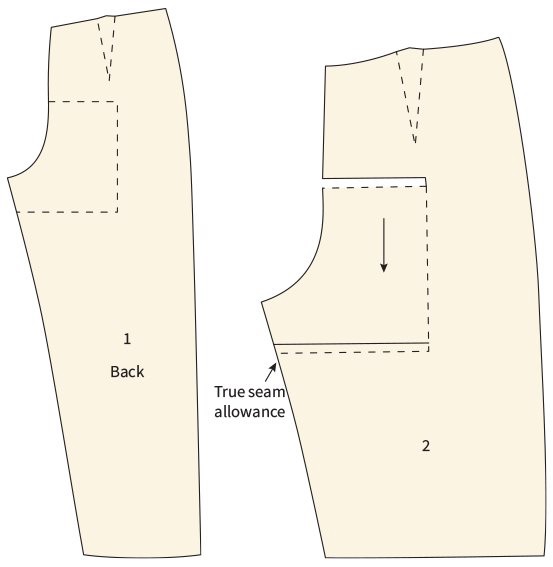
This back-crotch block can also be moved horizontally to add width across the back or vertically to lengthen the back-crotch seam. Moving the block inward adjusts for a flatter seat and thinner thighs.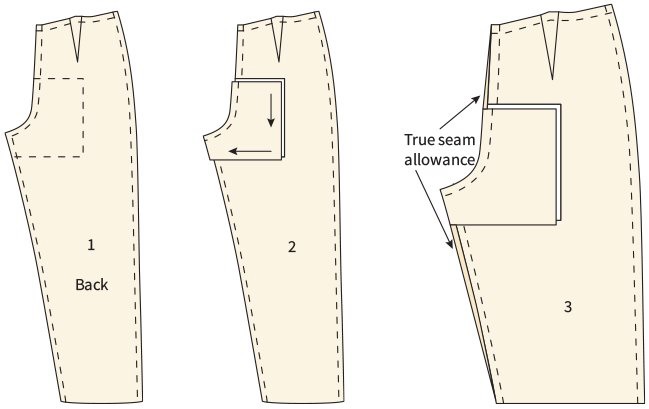
In these adjustments, the above-the-waist dimension and side seams remain unchanged. Stitching lines should be redrawn as required to meet the new location of the crotch curves.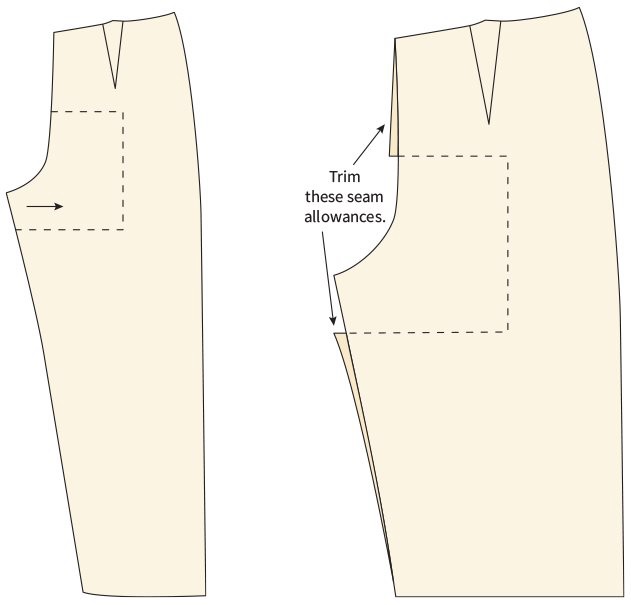
Approach 4: The Slash-and-Spread Method
The classic slash-and-spread method involves cutting into the pattern piece at points of adjustment, usually stopping just short of the edge of the paper to maintain a hinge, and pulling the paper apart to insert additions or overlapping it to make an area smaller.
This method can move important structural elements off grain, affecting how the garment hangs. It may also damage the original pattern if not traced first.
Diagrams usually show where to cut and spread or overlap, but they often lack clear measurement guidance, which can be confusing. This method may create multiple adjustments at once, some unintended.
Significant interior changes can alter the shape of the side seams, making it hard to true them smoothly.
However, slash-and-spread works effectively for enlarging a bust dart because the reference points for the cuts—the center of the dart and the front notch on the armhole—keep the adjustment controlled.
Approach 5: The Pivot-and-Slide Method
Pivot-and-slide combines two related techniques: sliding, which adds or removes length, and pivoting, which adds or removes width. Both methods keep the original paper pattern intact and can be done either directly on the fabric or on paper to create an adjusted version of the pattern.
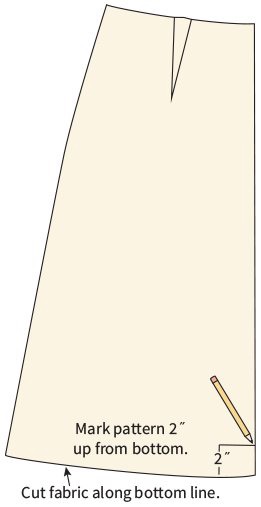
Sliding a Pattern to Shorten
The steps are similar to those for adding length, except the pattern is slid down below the cut hemline instead of above it.
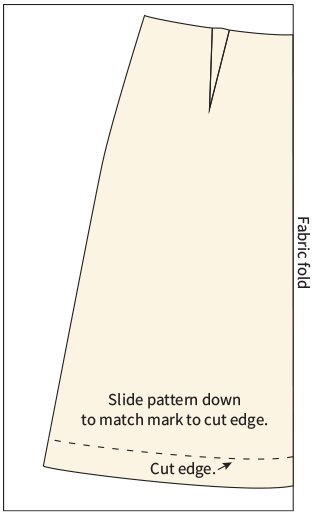
- Make a mark on the pattern 2˝ above the bottom of the pattern piece. Pin the pattern to the fabric.

- Cut out the hemline or bottom of the pattern piece only. Do not cut up the side seam. Unpin the pattern and slide it down so the bottom of the cut hem is even with the 2˝ mark. Cut out the remainder of the garment, truing the side seams as required.

Approach 6: The Seam Method
The seam method allows significant adjustments along internal seamlines without distorting them, moving the garment off-grain, or creating problems elsewhere.
In this system, the pattern’s seam allowances are cut free at the stitching line and hinged at each end of the alteration area or along curves. They can be pulled out or moved in to add or subtract fabric from specific areas.
This method allows changes without having to true the seams, maintains the shape of the original pattern, and adjusts only where needed. It is especially useful when working with shaped areas, such as princess seams, or when changes are required in a specific body area, such as the abdomen.
Conclusion
Altering a pattern is essential for creating garments that fit comfortably and flatter your body. By mastering simple techniques like lengthening, widening, and bust adjustments, you can customize any pattern to your unique shape. In the end, a well-altered pattern doesn’t just improve the look of a garment, it makes the entire sewing process smoother and far more enjoyable.
References
[1] Emodi, B. (2018). SEW . . . the Garment-Making Book of Knowledge: Real-Life Lessons from a Serial Sewist. Stash Books.
[2] Smith, A. (2012). Dressmaking: The Complete Step by Step Guide to Making Your Own Clothes. Penguin.
[3] Aldrich, W. (2015). Metric pattern cutting for women’s wear. John Wiley & Sons.
[4] Kiron, M. I. (2025a, March 3). A basic guide on pattern alterations for beginners. Textile Learner. https://textilelearner.net/pattern-alteration-techniques/
You may also like: Pattern Making Process in Garment Industry