
Methods of Marker Drawing and Duplicating:
We know that, marker is a thin paper which contains all the size of pattern pieces for a specific style of apparels. It gives guidance for acutal fabric cutting. Marker making is an important part of garments manufacturing process. After finalization of marker planning, marker drawing is done. It should be drawn on white paper, because using the marker, patterns are cut from fabric lays. Marker is attached on the fabric lay with the help of pins and sometimes adhesives are there under the marker and in that case the marker is attached lightly with the fabric by ironing. The marker acts as a guide for fabric cutting. Generally production patterns are placed on the marker and marking around it with the help of fine pencil or other thing, the image of that pattern is made skillfully on that marker. In the case where the marker is made directly on the fabric, in different way such as color spraying, the image of the pattern is given on the fabric. With the cutting of fabric lay, marker is also cut, as a result in most of the times, it becomes necessary to make and use multiple copies of a marker.
There are various processes of marker drawing and copying and in most of the cases the copying of a marker is related with the drawing of a marker. For this reason, marker copying has been discussed simultaneously with the marker drawing. But in whatever processes the marker drawing and copying be done, some technical necessity must need to be fulfilled. For example, need to ensure that in the marker, the image of the patterns will be exact of the same dimensions of the patterns and the lines be fine and prominent. If the lines are thick, during fabric cutting it is unsuitable to cut the fabric with the blade of the knife by following the fabric cutting lines properly.
The methods of marker drawing and copying are discussed below:
1. Marking by Hand on Paper:
This method is much used method of marker drawing of both old and modern times. The pattern piece is placed on the paper as per the marker planning. Then with the help of fine pencil or ball pen, marking around the pattern, the exact image of the pattern is made on the paper. Then removing the pattern from the paper, the size code is written on that image of the pattern.
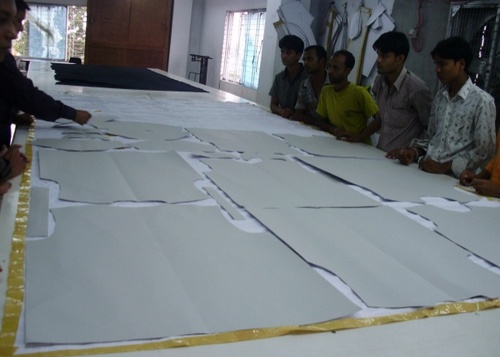
Sometimes spots are there on the marker paper by which the fabric grain line is indicated. But if the marker for a check fabric is made with white paper, check matching is not possible. The type of the tools which are used for manually drawing marker depends on the method of marker copying. About the methods of marker copying and the machines or tools for marker drawing are discussed below:
a) Carbon duplicating method:
In this method 6 to 8 markers can be copied at a time. 3 to 4 carbon papers on both sides of which there are inked, that can be placed in each two markers. When the pattern image is drawn on the top paper with pencil or ball pen, then the image of the pattern is drawn in the bottom papers also. There are many disadvantages of duplicating marker in this system. Such as- working with ink on both sides of the carbon, ink adheres to hand and in various places. Due to duplicating with the carbon, the lines in the bottom markers remain almost invisible and they become thick, as a result, fabric cutting becomes inconvenient. The jobs of spreading and again rolling of the carbons properly are labor intensive and time consuming. But for duplicating of 3 to 4 marker in this system is easy and cheap. In the same system if the non-carbon duplicating paper is used in the marker, then comparatively larger number of copies can be done at a time.
b) Spirit duplicating:
The spirit duplicating machine and its working system is same like the duplicating machines which are used for duplicating in office. The only difference is that the dimension of this machine is greater than that of the office duplicating machine. 40 to 45 copies can be done from a master copy and due to copying in larger numbers, the average cost for each copy comes at a remarkably low cost. The disadvantage in this system is that if there is twisting, frowning, folding or becomes longer, then the copies will be defective. The greater the width of the marker, the larger the machine will be required and inconvenience in works will also be greater.
c) Duplicating in photographic method:
The exact copy of the original marker is made by using ultraviolet light on the light sensitive paper which is made visible later on with the help of ammonia vapor. In this method marker copy can be done very swiftly and accurately and innumerable number of copies can be done from a master copy.
d) Perforated marker:
Placing the patterns on the right places on the light pattern card as per the marker planning first, the image of the pattern is done by drawing around the pattern with pencil. After completion of drawing of all the patterns this way, small holes are made on the drawn lines in the marker. Long armed sewing machine is used for making holes where punch is used instead of needle. Generally, the holes are 2 mm in diameter. The size code of each pattern is also made with this machine. The perforated marker is placed on the fabric lay and the powder of French Chalk is spread and rubbed. Then the marker is removed and the French chalk takes place in drops which show each pattern as an image. Oil or resin is used with the French chalk so that they (the chalks) can be adhered with the fabric as doted. If the marker made in this system used with care and caution, then a marker can be used many times. In order to make this marker it takes double the time and money than the manually made marker. But if the marker can be used many times, then the cost is minimized. Sometimes during fabric cutting, the chalk dots may be displaced or removed, because of which it becomes difficult to cut the fabrics smoothly. In addition to this, the pattern lines seem to be thicker due to the shape of the chalk dots, resulting problem to cut the patterns properly. To give layer of chalk powder on a large area is a very dirty job. With the help of brush the holes are cleaned time to time so that they (the marker holes) are not closed with chalk powder. This process is rarely used in modern time.
You may also like: Pattern Making Process in Garment Industry
2. Computerized Marking on Paper:
When the marker planning is finished on the computer screen, then that marker is stored in the computer memory. As a result, that marker can be displayed on the screen any time. The printout of the marker can be obtained from the plotter attached to the computer. The markers that are drawn or copied with the help of computer, they are very beautiful and accurate. With the help of a beam and a pen in computer plotter, the image of each pattern is drawn by their combined movement. If there is big plotter, then full size pattern is obtained and if there small plotter, mini size marker can be drawn. Generally a computer is given instructions at night for multiple copies. As a result the computer and the plotter themselves copy the marker whole night without presence or assistance of anybody. The required papers for marker are kept store in rolls at one side of the table from where paper is supplied continuously. For shrinkable fabrics, the pattern larger than requirement, for example 1% longer patterns also can be drawn with the help of computer. Computer aided marker drawing and copying is the best and accurate method, but its initial investment cost is very high.
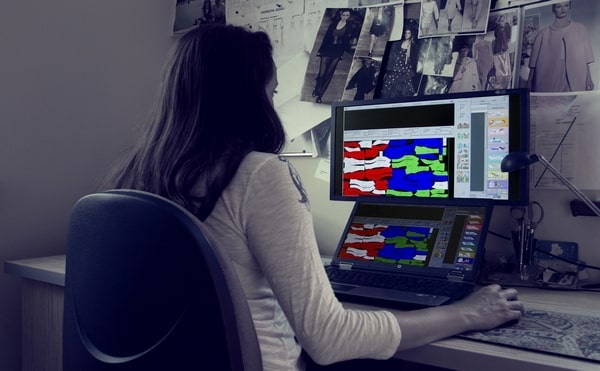
If there is computer controlled cutting arrangement, then there is no need of marker drawing and copying. Because using only disc, the computer controlled fabric cutting knife can be operated.
3. Photographic System:
In this system there is no need of drawing the marker on paper. The image of the marker is created on light sensitive paper. In this system, marker can be drawn in two ways.
First, the patterns are placed on the light sensitive paper as per the marker planning. Then it is passed on the ultraviolet light and later that marker is made visible with ammonia vapor. For identifying the patterns within the marker, code number is written by perforating it, as a result, that number is visible in the marker also. Markers produced in this system are very accurate, correct and beautiful. Marker copies are made through the photographic copying system. The initial investment for this system is very big but it takes less production time and also the labor cost comes lower.
Second, the patterns are placed on the marker table (vaccum type), then the patterns are covered with light sensitive marker paper. Ultraviolet light is focused from under side. Then the marker is exposed in the ammonia vapour.
4. Drawing by Chalk or Pencil:
In this system, the marker is drawn directly on fabrics. As per the marker planning, the patterns are directly placed on the fabric. Then around the pattern is drawn by chalk or pencil and then the pattern is removed from the fabric. The chalk with which the drawing is done, is generally made by pipe clay, but in addition to that, it is also made with wax, fluorescent or vanishing. It is very difficult job to draw fine lines with chalk, as a result, sometimes accurate pattern is not obtained. Moreover, if the dark color chalk is used on light color fabric, then sometimes spots may appear on the fabric. For drawing marker in this system, good efficiency and much time are required. Marker drawing in this system is the ancient and much used system. But this system is rarely used in garments industries, but in the tailoring shops it is still much used a system.
5. Marker Drawing by Paint Spray:
In this system, drawing of marker directly on fabric was introduced in 1950. Specially for check fabrics, the system was used widely. As per the marker planning, placing the pattern on the fabrics, they are pressed with the netted frame so that the patterns are pasted finely with the fabric and cannot move. Then with the help of machine, from the spray head, colors are sprayed on the whole marker by nozzle. As a result when the patterns are removed from the fabrics, then that places remain vacant this means they remain without color. But due to color in the adjacent places, the image of the pattern is visible on the fabric. Generally, yellow or blue colors are used in this work.
Presently this system is rarely used for drawing of patterns, because this system has many disadvantages. Every day the color spray machine needs to be cleaned which is a very costly job. Due to the continuous deposit of colors on patterns, it becomes very thick and weak, the shape is changed to some extent and the fine lines of patterns are not found always. Due to the limited dimension of machine, markers also can be done in limited dimension. When color spray is done on less absorbent fabric, it does not easily adheres on the fabric, again when the color spray is done on high absorbent fabric, then paint migration happens to the adjacent places. As a result, the pattern lines do not remain in right condition.
References:
- Garments & Technology by Prof. M. A. Kashem
- Garment Manufacturing Technology by Md. Shafiul Azam, Md. Abu Saleh & Khondokar Abu Nafiz
- Apparel Manufacturing Technology by T. Karthik, P. Ganesan, D. Gopalakrishnan
- Garment Manufacturing Technology Edited by Rajkishore Nayak and Rajiv Padhye
- https://textilelearner.net/techniques-or-methods-of-marker-making/